Pin It

Thursday, March 28, 2013

Decisions, Decisions All based on trial and error

I was cruising Pintrest today and my phone went off, text message from my BFF Tammy.  She pinned something that she thought I should try for Easter.  Nice!!!!  Something new to try.  
I guess I should tell you something about me, I never try something new on the day I'll be serving.  Never!  So who benefits from the testing?  Anyone that's close. Usually hubby, which he totally appreciates, and anyone home at my family home.  Unfortunately my sister Christin is out of lucky until Sunday.  See she gave up sweets for Lent.  Eek!  In that time she has missed 3 birthday cakes and anything I make that's sweet.  Needless to say she has not been a very happy person lately.  Thankfully it will be over for her soon.  She has requested the brownie in a mug as of 12:01 on Sunday.  LOL

This holiday I did not ask what anyone wanted for dessert this time.  I usually do but I usually get the same results.  Something I've made countless times.  So when Tammy sent me that text, she will never know how thankful I was.  Now I've never made these before so it really is trial and error.  Easy peasy cream puffs.  I do mean easy, if you heed the instructions.  Which I must say I did not.  *sighs*

I did fix it and they came out very tasty but there are somethings I will be changing the next time around.  The pin was from Lille Punkin.  And for once I really did follow the instructions without changes and this was the result.

The first thing I must stress is to follow the listed saucepan size.  When she says small, she means small.  I would not recommend doing it in anything bigger than a quart sized saucepan.  Anything larger and you will have a difficult time figuring out when the dough pulls away from the pan.  

This recipe makes 6 - 9 puffs.  I recommend just using your tablespoons to drop the dough, quick and easy.  

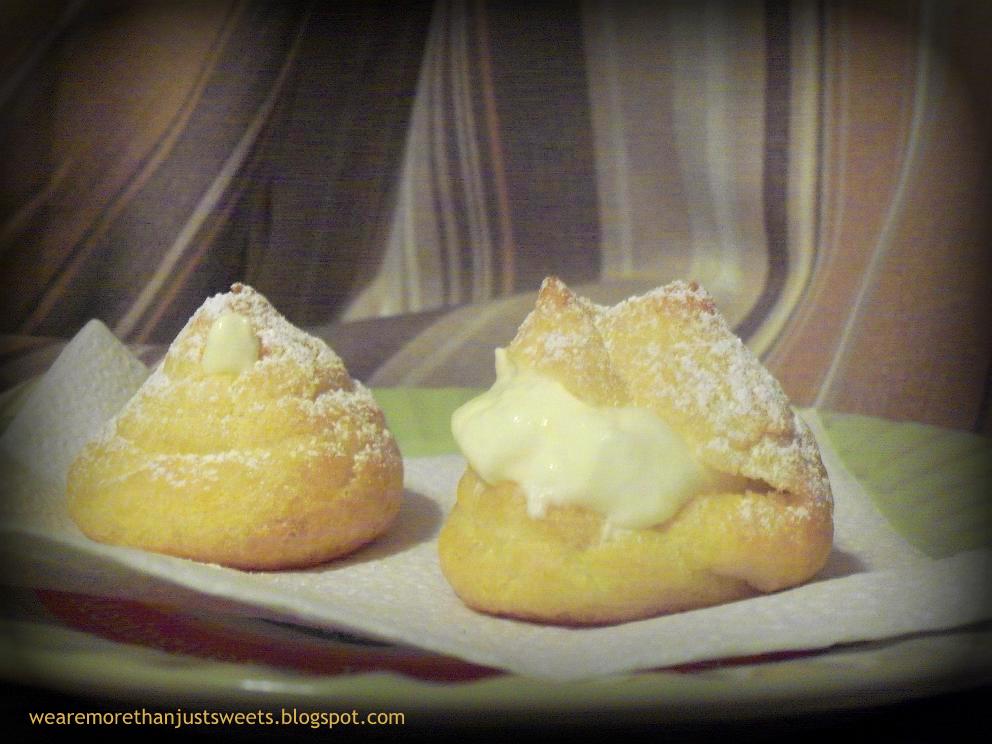
Then there is the filling.  This time I used banana pudding, which it turned out wonderfully.  I didn't have a can of Rediwhip so I made 1 cup (8oz) whipped cream and folded that into the pudding.  I liked it but I like mine a little thicker, richer more like a mousse texture.  So next time I will use 1 cup milk and 8oz Cool Whip.  I know, bad Melody!  But I do like the texture better.  Oh and FYI, when I use a pudding if it's not sugar free I will use a sugar free Cool Whip as not to add any extra sugar to the dessert.  I like sweet but not tooth hurting sweet.  I also used my silpat mat instead of parchment paper and it worked just fine.  I filled one without cutting and one after cutting.  Either way it works.  Just be careful if filling without cutting it open.  Blow outs are possible.  You can use whatever flavor pudding you like.  You can top them with some extra whipped cream.  If you use chocolate pudding, you can top with some chocolate syrup or a dusting of cocoa powder.  If you do a vanilla I would recommend a caramel syrup.  Oh yum!  I haven't decided what flavor pudding I'm going to do for Sunday, but I know that these will definitely be on the menu.  So THANK YOU TAMMY for find this and pinning it for me!!!!  Can't wait to see how yours turns out. ;0)   Please make these, they are light and fluffy and so yummy.  Plus being easy to make, makes it great for a last minute dessert.  Whether you make them for Easter Sunday or just because, no matter what pudding you use or whether you use whipped cream or Cool Whip, remember that the best ingredient to any recipe is you.... Enjoy!!!!   

Tuesday, March 26, 2013

I promised you something sweet ... Boy do I deliver and with few ingredients!

Hi everyone!  I know I promised you something sweet.  I know lately my posts of recipes have been more savory than sweet.  And I knew I was going to have to post something for you all soon, THEN hubby complains there's nothing sweet in the house.  I counter with yes there is, there are cookies.  He said NO YOU'RE SWEETS!  Really?  So I went pinning today and found on a blog I follow, Six Sisters' Stuff (http://www.sixsistersstuff.com/), a recipe for Lemon Cool Whip Crinkle Cookies (http://www.sixsistersstuff.com/2011/08/lemon-cool-whip-crinkle-cookies.html).  Now that I've made these cookies and I can tell you they are light, fluffy, chewy, addicting, and messy.  LOL 

And YES!  You read that right, COOL WHIP cookies.  I was skeptical at first then continued to read their blog and the following comments posted.  So I figured what the heck.  I had everything but the cool whip and would just pick that up at the store.  But I must note, have I ever told you how much I despise using box cake mix.  It will do in a pinch BUT I figured since I have no children at home and am baking something for the people I love then it should be made from scratch.  Yes I could have looked for a recipe for what "cake mix" I decided on but I happen to have some on hand.  

We went S E A R C H I N G for this cake mix everywhere when we were making hubby's birthday cake last year.  For those of you that don't know or don't remember, he wanted a dreamcicle cake (http://wearemorethanjustsweets.blogspot.com/2012/06/ever-since-i-can-remember-i-have-made.htmland the only recipe that I could find said if you could find it to use orange supreme cake mix.  We could not find it anywhere!  So as luck would have it, we were taking care of my nephews for a couple days out in Plainfield, Illinois and low and behold, at their local Mejier, what do I spot in the baking aisle?  Duncan Hines Orange Supreme Cake Mix!  AND it's on sale!!!  So since I have it and hubby LOVES orange more than lemon, I figured that's what I'd make.  Of course it is such a simple recipe what could I possibly change to make it my own?


So since mine are made with orange cake mix, I'm calling mine:  Orange Cool Whip Cookies
Ingredients
1 8oz tub Cool Whip, thawed  I used sugar free to lower the sugar content a little since they are covered in powdered sugar.
2 Large Eggs, room temperature
1 18.25oz Box of Duncan Hines Orange Supreme cake mix (You can substitute your favorite cake mix here, FYI I might just buy another one to try a different flavor! LOL)
1 Teaspoon Orange Zest for the lemon I would do lemon zest.

Directions
Preheat oven to 350 degrees.
Lightly grease baking sheets.  I did not grease mine I used my silicon mat.
Beat together the whipped topping and eggs.
Add the zest because once you get the cake mix in it gets thick and sticky.
Add the cake mix and continue to mix. Dough will be thick and sticky.  
IMPORTANT!  Refrigerate for 30 minutes.  If you don't have to let the cookie sheets cool in between, put the dough back in the refrigerator.
This is where things get a little messy:  Drop by teaspoonfuls into a bowl of confectioners' sugar and roll to coat or use a spoon to roll them around.
Place cookies on the prepared baking sheets. 
Bake  for 9-11 minutes.  
Cool on racks.


You will be tempted to try and eat them warm.  They are so good!  Nice and light.  Chewy.  I didn't miss the extra sweetness from the Cool Whip at all.  Definitely one to try different cake flavors on, so now I will simply say these cookies are my exception to the rule of using box cake mix.  ;0)

So try it for yourself.  Use your favorite cake mix, whatever that may be.  I might try a spice or carrot cake mix next.  Hmmm .... YUM!  In the meantime remember that no matter what cake mix you use, or how you change it up the best ingredient to any recipe is you ... Enjoy!!!!!

Sunday, March 24, 2013

Memories with a twist ... It's all in the sauce

I remember when we were younger, Sunday dinners with family.  All that Italian food.  What memories it brings back!  But how long ago that all seems.  I was feeling a little nostalgic today, but wanted to do it a little different to make my own memories with hubby.  
As of late I have been trying to make things a little healthier, which means more veggies. I don't mind the veggies and so it seems neither does hubby.  When I think Sunday dinners I think spaghetti with garlic bread and meatballs or Italian sausage.  So that's exactly what we had.  Well almost!  I did say I wanted to add more veggies right?  And I so didn't have garlic bread, so that wasn't an option.  One would think.  I was looking to make a quick sauce but didn't have any crushed or fresh tomatoes.  But that didn't stop me.  There is nothing wrong with semi homemade, sometimes it can be better than made from scratch. It all depends on you and your imagination.

So today I made my imagination AND our tummies happy.


Bucatini with a chunky veggie pasta sauce, Italian Sausage baked in tomato sauce and fire roasted peppers, side salad, and garlic Parmesan mini monkey bread.  Oh yeah!

For those of you that don't know, bucatini is a long, thick pasta that has a hole running though the center.  I like this one because it give the chance for the sauce to get in the center of it so your yummy sauce is all the way around the pasta.  
Let's start with some recipes:
Chunky Veggie Sauce
24oz Jar or can of your favorite pasta sauce (I used Barilla Garlic and Mushroom)
8oz Tomato sauce
8oz or 1 Cup of water
2 Cloves of garlic, minced   I used 1 teaspoon of minced garlic in olive oil from a jar.
1 Tablespoon EVOO
2 Medium carrots, chopped
1/2 Medium onion, chopped
1/2 Zucchini, chopped
1/4 Cup grated parmesan
1 Teaspoon Italian Seasoning  I used seasoning mix from Key Ingredient. (http://www.keyingredient.com/recipes/246578817/italian-seasoning-mix/ minus the red pepper flakes)
Put EVOO in sauce pan and saute the carrots for about 5 minutes stirring to make sure they don't burn.
Add garlic, stirring often so it doesn't burn and turn bitter. This should only be for about 2 - 3 minutes.
Add onions and zucchini.  Saute for about 3 - 5 minutes.  You want them to be tender but not mushy as they will continue to cook a little in the sauce.
Add pasta sauce, tomato sauce, and water.  Stir until blended.  If you feel that the sauce is still a little to thick add more water to thin it out.  We LOVE a thick sauce.
Add seasonings and Parmesan stirring until blended.  Bring sauce to a bubble and turn down to a simmer and let it cook for about 20 - 25 minutes.  
Don't forget to check your seasonings. 

Now for the Garlic Parmesan Mini Monkey Bread
This recipe was adapted from Eat Cake For Dinner (http://eatcakefordinner.blogspot.ca/2012/01/mini-garlic-monkey-breads.html?m=1#)
1 Can Butter Flavored Grands Biscuits
5 Tablespoons Unsalted butter, melted
1 Teaspoon Granulated Garlic
1 Tablespoon Dried Parsley flakes
1/2 Teaspoon Italian Seasonings
1/4 Cup Grated Parmesan + 1 Tablespoon to sprinkle

Directions

Cut biscuits into 6 pieces and place in a bowl.
Combine remaining ingredients.
Pour over biscuit pieces.
Gently toss to evenly coat.
Place 6 pieces in each muffing cup.
Sprinkle remaining 2 Tablespoons of cheese over the top of each muffin.
Bake at 400 degrees for 12-14 minutes.  Serve warm.  Makes 8.


Italian sausage needs no recipe, wrap them in foil.  Add 1/2 cup tomato sauce and as many  jar fire roasted peppers that you want.  

Side salad to add more veggies to the meal, along with some cannellini beans.  Figured I'd throw them in because they're low in fat, high in protein and fiber.

A little more total carb then I'd like in one meal but it was so good.  I love that the sauce had so many veggies in it and was very clean tasting.  Definitely stood up to the memories of long ago.

If you like a little more garlic, feel free to add more.  But remember to taste your sauce as you go along so you don't over do it.  Some people don't realize that some flavors get stronger after they have cooked and had a party in the pan.  Try these recipes together or separately.  Change what you want, add what you want, or omit what you want.  These a recipes that can be easily changed.  Doesn't matter what you do to them as long as you enjoy them.

Desert is spumoni ice cream ... so no baking this time for me but I SO see something sweet in the near future.  So make sure to keep your eyes open for it!  Not sure what it will be yet ... any suggestions?  LOL

In the meantime remember that no matter what you change, or how you change it the best ingredient to any recipe is you ... Enjoy!!!!!

Friday, March 22, 2013

The Twist On Salmon Patties ... Tuna Cakes

We're close to Easter which means Lent is almost over.  It's hard to not always eat the same things when you feel like your options are limited.  But they are only as limited as your imagination.  My problem is hubby.  LOL  I truly believe that he had a bad experience with fish when he was younger, and now he won't eat fish that isn't breaded and fried.  On top of that he doesn't like any kind of sauce.  Imagine a McDonald's Fish sandwich no tarter sauce.  Who does that?  LOL  The one thing he will eat is my salmon patties, at least I think so.  I made them once for myself while hubby and my nephew ate shrimp.  They tasted my patties and now I was left with 1.  So not right, but was VERY excited that they liked them.  So I thought hey salmon patties but I guess I already ate the salmon, darn!  So I went look because I definitely have cans of tuna, can't I substitute?  I can!  After reading several and discarding I came across a recipe for Tuna Cakes from Life Currents (http://lifecurrents.dw2.net/tuna-cakes/#) but I wasn't interested in the tuna cakes recipe, I was interested in the Come Back Sauce.  I have seen it mentioned but never had it explained so that I understood what it was.  So I copied the recipe to make it, even though I'm SURE I will be eating it alone.  Then kept searching for a tuna cake recipe that interested me.  I just cant see putting mayo in the recipe for tuna cakes, might as well eat tuna salad.  So I came across the recipe from Skinny Mom for Skinny Tuna Cakes and these sounded doable.  (http://skinnymom.com/2012/03/12/skinny-tuna-cakes/)  Then I went looking for a side.  I know I wanted one with veggies in it and I wanted it light.  Nothing like mac and cheese. Not potatoes.  Rice maybe?  I found what I was looking for.  After reading the reviews I had to try it, Skinny Taste's Broccoli and Orzo (http://www.skinnytaste.com/2009/03/broccoli-and-orzo.html).  Of course I had to make minor changes to it all, just to make it my own.  It was definitely delicious and hubby had seconds.  
Come Back Sauce
1/4 Cup Mayo (I used Hellmann's made with olive oil)
1/4 Cup Greek Yogurt
2 Tablespoons Ketchup
2 Tablespoons Chili Sauce
1/2 Teaspoon Granulated Garlic
1/2 Teaspoon Granulated Onion
1 Teaspoon Worchestire Sauce
1/2 Teaspoon Black Pepper
Mix together and let set over night in fridge so the ingredients can have a party together.  
It is definitely a come back to it sauce.  The original recipe calls for oil, which I omitted because the mayo was made of it and hot sauce as we don't eat spicy food.  

My recipe for the Tuna Cakes:
3 5 oz cans Tuna, drained I used tuna in water but your choice.
3/4 Teaspoon Old Bay Seasoning (which is basically celery salt, red pepper, black pepper, and paprika)
1/2 Medium Onion, finely chopped
1/4 Teaspoon Black Pepper
1 whole egg + 1 egg white
1/4 Teaspoon Granulated Garlic
1/4 Teaspoon Lemon Pepper
1/4 Teaspoon Lemon Peel
1/4 Teaspoon Dill
Mix ingredients in small bowl.  Measure out about 3 tablespoons of the tuna mixture (I used a scooper) and roll into a ball.
Let set for 5 minutes in fridge.
Place in lightly sprayed non-stick skillet.  Flatten slightly with spatula and cook until golden brown, about 5 - 7 minutes, and flip.  Repeat.

Veggie Orzo Side
6 oz, a little less than 1 Cup of Orzo Pasta  I used Barilla Omega 3 pasta
1 1/2 Cups Frozen Broccoli as I didn't have fresh
1/2 Cup or 3 Small or 1 Large Carrot
4 Cloves of garlic, smashed and chopped  I used minced garlic from a jar that is stored in olive oil (2 teaspoons is equivalent to 4 cloves)
3 Tablespoons EVOO  I used 2 as my garlic contained olive oil.
Salt and Pepper to taste  I substituted using McCormick's Roasted Garlic and Red Pepper in place of the salt as it contains extra spice along with salt.

Steam veggies until firm but tender.
Cook pasta following package directions, don't forget to salt you water.
Drain pasta reserving about 1/2 cup of pasta water.
In the pan you used to cook the pasta, add EVOO and once the oil heats up and starts to shimmer add and sautee garlic until fragrant.
Add veggies and seasoning sauteing for a few minutes.
Add pasta keeping it wet using the reserved pasta water, for about 3 - 5 minutes.

It was quick, easy, and mighty tasty.  And I love that it had many vegetables as well.  Hubby never said anything about all the vegetable this time.  Next time I think a squeeze of lemon after it's done ... I bet I could get my BFF, who dislikes all seafood, to try this.  OK maybe if I cook it for her.  *snickers*  So try it for a quick dinner and take the leftovers for a healthy lunch.  I'm lucky enough to get to eat the left overs over another salad and it's something I'm REALLY looking forward too.  Oh and hubby's sauce issue, not so much with this one.  Complained that I put it on the side instead of on the cakes.  ;0)  So please make these, either all together or individually and let me know how it tastes.  Add what you like or change what you don't.  But remember no matter what you change, or how you change it the best ingredient to any recipe is you .... Enjoy!

Thursday, March 21, 2013

Pork with mushroom onion gravy ... a little healthier

So lately I've been thinking I need to start making some of our meals healthier.  Not be a TOTAL health nut but maybe meet somewhere in the happy medium.  Well on somethings anyway.  So as I stood before the freezer deciding what to take out hubby FINALLY speaks up and says he wants pork chops.  Oh Yay!  What kind I ask.  Whatever kind you make is fine. Grrr! LOL  So out come the pork chops to defrost for tomorrow and now I start thinking what can I do.  Oh I have some mushrooms I want to use up. Hmmm... Then I start reading about to make things healthier, what is a healthier substitute, etc.  Now the question is will it taste good?  I really don't want to have to sacrifice taste for healthier and do I have the means to do that?  I sure do and did.  I can't believe the results of what I came up with.  Hubby's comment of course was that was different, it had more vegetables.  I said that's not so bad, he said not at all.  Winning approval I tell you!  So what did I make, you won't believe it unless you see it:


Oh Yeah!  Healthy AND yummy!
Pork chop with a mushroom and onion gravy with pan roasted sweet potatoes, carrots, and onions.  Can't forget the steamed broccoli.  That has been my craving for a while.
Recipe for the Mushroom Onion Gravy
Ingredients
4 Baby Bella Mushrooms, cleaned, and sliced
2 White Button Mushrooms, cleaned and sliced
1/2 Medium Onion, sliced
1 Tablespoon coconut oil
Sprinkle of Kosher Salt
2 Tablespoons Butter
1 Tablespoon flour
1 1/2 - 2 Cups Room temperature low sodium beef stock
Heat oil in pan.
Toss in mushrooms and onions, sprinkle with salt and sautee about 8 - 10 minutes.  
Place in small dish and set aside.
In same pan, melt butter.
Once butter is melted, add flour and cook for a few minutes.
Slowly add the stock and stir until gravy thickens.
Add mushrooms and onions back in pot and set aside.

Pan sear pork chops.  I used coconut oil and seasoned them with pepper and some Spice Club Seasoning Grinder for Steak and Chops.  When I do this I avoid adding any additional salt as it already contains salt.  Sear pork chop on both sides.  Now if you pan is not oven safe and has a handle you can wrap it in foil and safely stick it in the oven.  Mine are safe to 350 degrees, which is what I set my oven for.  Pour gravy over chops, pop in oven to finish cooking.15-25 minutes or until thermometer reads 165.

For the roasted sweet potato side, really simple:
1 Tablespoon Butter
1 Tablespoon Coconut Oil
1 Large Sweet Potato, peeled and cubed
2 Large Carrots or 4 Small, peeled and sliced
1/2 Medium Onion
Couple grinds of pepper
1 handful of chopped pecans
Melt butter and oil in frying pan, and med heat.
Add sweet potatoes, carrots, and onions and cook.  
I throw a cover on for a few minutes at the beginning to get them to soften then remove the cover to finish roasting them.
When they are fork tender about 20 minutes, throw in a handful of pecans and serve.

Simple and way healthier and did not lack in taste at all.  Hubby definitely loved the side, kept picking out of the pan.  That's when you know it's good.

Simple, healthier, and tasty.  Can't ask for much more!  Definitely something to remember and do over again.  Add more veggies is definitely in the mix of things for us, gotta shake us out of that hibernation period.  But this is the basics, if you want to fatten it up feel free.  You can substitute oils if you like.  If our daughter were here I couldn't use the coconut oil, as she is allergic to coconut. EEK!  But I'm sure I would figure out a way to keep it healthier.  Having been doing a lot of reading lately I have confidence that I can make some changes that will be both delicious and good for us.  But remember that no matter what you change, or how you change it the best ingredient to any recipe is you .... Enjoy!!!!

Tuesday, March 19, 2013

Taco Pizza and Brownies in a Mug ...What a weekend!

This past weekend turned out to be pretty funny for me.  Hubby asks for pizza quite often, if he can't get me to make it  he usually asks for Domino's or Pizza Pizza.  Yes I know that's Little Cesar's but it is what he asks for.  Honestly I didn't feel like cooking but I'm not as infatuated with pizza as hubby is. What to do?  I didn't have the normal ingredients to make a pizza at home so I started looking to see what I had.  Then I found this recipe from Table for {7} (http://www.ourtableforseven.com/) for Taco Pizza.  Oh boy!!!!  I think I have that ... so off to search.
Ground beef .... Check
Refrigerated pizza dough ... Check
Cheddar cheese ... nope but I have Mexican blend, that works.
Taco seasoning .... oops!  Normally I have extra laying around but I must have used it and didn't replace it.  Bad Melody ... (smacks hands) LOL
So I have a recipe for taco spice mix but it's definitely way more than I need, and not enough spices to make the extra.  So I tried the one that I ALSO found at Table for {7} and it was wonderful.  Off to make taco seasoning mix, with my changes of course.

Taco Seasoning Mix
2 Tablespoons Ground Cumin
1 Teaspoon Ground Coriander
1 Teaspoon Smoked Paprika
1/2 Teaspoon Granulated Onion (Powered will work as well)
1/2 Teaspoon Granulated Garlic (Again powder is fine here)
1/4 Teaspoon Black Pepper 
1/4 Teaspoon Chili Powder
Pinch of Cayenne Pepper (I don't eat spicy stuff, so a pinch was enough for me and didn't make me feel like I was missing anything.)
Directions
Mix in small bowl but store left overs in air tight container.

OK ... seasoning mix made now to brown the ground beef.  When making anything I always layer my flavors and with the same thing.  So I used some granulated garlic, granulated onion, a couple dashes of coriander and a couple dashes of dried cilantro.
After meat had been cooked and drained, I added 2 tablespoons of the taco seasoning and let it set to meat grab the flavor.

Cook dough according to package instructions.  I seasoned the dough with a little of the dried cilantro before baking.  Once dough has been precooked, using 1/2 to 1 cup of refried beans (I used black refried beans). I sprinkled about 1/2 - 1 teaspoon of the taco seasoning on top of the spread beans.
Next spread the cooked seasoned meat on the beans, followed by the cheese.  I added some Mexican oregano and a little more dried cilantro to the top of the pizza and threw it back in the oven for about 10 - 15 minutes until cheese was melted and crust is browned.  Take out and sprinkle with additional toppings.  I waited a few minutes to let it cool and added some lettuce, tomato, and sour cream.  Think taco toppings though.  Here is the humor of it.  Hubby brought home a pepperoni pizza from Pizza Pizza (still makes me laugh).  I cut MY pizza in 12 pieces so there was an even amount to each pizza.  Why was there less of mine left than of the pepperoni pizza.  Oh isn't home cooking grand!!!!
This was the result.


He's also always looking for sweets on the weekend.  I have been of a mind that I don't want extra sweets laying around the house.  Either I get frustrated that they go to waste because they don't get eaten OR feel bad that I don't want it to go to waste so it gets eaten, which isn't necessarily good either. *sighs*  So when he asked what did I bake for desert I had the PERFECT option. Single serving brownies.  
OK ... It's a little messy but OH so good.  Adapted, of course,  from The Family Kitchen (http://blogs.babble.com/family-kitchen/2011/09/13/two-minute-mug-brownie/).
It's not the picture ... one is darker than the other on purpose. 
Brownie in a Mug
1/4 Cup All Purpose Flour
1/2 Cup Dark Brown Sugar
2 Tablespoons Unsweetened Cocoa Powder  ( I used dark chocolate for mine, which I like better.)
Pinch of Salt
2 Tablespoons Canola
2 Tablespoons Coffee (can use milk, coffee, or water)
1/2 Teaspoon of extract ( I used almond in mine and vanilla in his)
Mix ingredients in mugs or ramekins. Will be like a paste texture.
Microwave for 30 seconds and check.  Usually takes a minute but all microwaves are different.  Should be springy to the touch but still gooey.  
Let it cool a little before eating as it will be HOT.  
I threw a dollop of left over chocolate whipped cream on top.  Oh so good.  I think next time I'll throw in some cinnamon too.  But definitely try it and no left overs to tempt you.  No matter which recipe you choose, no matter what ingredient you change just remember that the best ingredient to any recipe is you .... Enjoy!!!!

Friday, March 8, 2013

Hmmm ... Simple Tomato Soup

It's Friday!!!  And Lent!  So no meat today, but that doesn't mean you have to suffer.  Thick, rich tomato soup with a grilled cheese is just what the wife ordered.  And hubby, who ONLY likes Campbell's Tomato Soup with a dash of milk AND a whole lot of pepper, totally agrees that this should be our go to tomato soup recipe from now on.

I was originally going to make salmon patties but REALLY didn't want to figure out a side.  Salad is always a given but mac and cheese, though traditional, is not what I wanted.  So instead I went looking in the pantry.  Problem is Friday's are early days for hubby to leave for work SO it has to be something quick or something that can be heated up but still taste like you just made it.  I have NO problem with left overs but I always want to provide a good meal to hubby.  Having already made and frozen homemade gravy (meat sauce) and some marinara I noticed that I have some canned tomatoes left.  I also noticed the Campbell's tomato soup, yes I keep some on hand just for hubby.  I have nothing against canned soup per say BUT I really don't like canned tomato soup.  For me Campbell's is sweet and others kind of have a tinny taste to them, at least in my opinion.  Then I thought "Hey it can't be that hard to make tomato soup from scratch right?"  So off I went looking for a recipe.  Figured I'd make it the night before because like all soups, stews, and chilies the more they sit the better their flavors meld and taste oh so much better.

So I found a simple recipe, yes it's even in the description, for tomato soup.  Since it was my first time making it I didn't tweak it too much.  I pretty much followed the recipe this first time and Heidi at Food Doodles had a wonderful one!  (http://fooddoodles.com/2012/02/24/simple-tomato-soup/)   Here is the result of my take on it:

Simple Tomato Soup

Serves 4

2 tbsp butter (or oil)
1 onion, this depends on if you will pureeing the soup.  I did a rough chop as I pureed because I used whole tomatoes.
3 cloves garlic, again this depends the puree non puree step.  I used my garlic press.
1 32 oz can of tomatoes, pureed, diced or whole
1/4 tsp baking soda
1 tbsp dried parsley
1 large bay leaf
Black pepper to taste
1/4 tsp sea salt, plus more to taste (I did not use any salt in mine and it came out VERY tasty.  Hubby is borderline on the blood pressure so the less I use salt the better. :0))
1 tbsp fresh basil  Here I use dried as fresh is out of season for us plus I didn't find any good looking stuff at the store.  
1 tbsp honey
whole milk or cream to serve if desired(about 2-4 tbsp per serving depending on how you like it)

In a small to medium sized pot, melt the butter(or just heat the oil) over medium heat.  
If you have no way to blend your soup once cooked, finely chop your onion and very finely mince your garlic, otherwise, just slice it to saute it quickly.  
Add the onion to the pot, stir well and saute for 5-6 minutes before adding the garlic.  Again, stir well and saute for 2-3 minutes.  
Add the tomatoes, baking soda, parsley, bay leaf and salt and pepper.  
Bring up to a boil, then turn down to a simmer.  Simmer for 10 minutes or so over medium low heat.  
VERY IMPORTANT:  The baking soda will foam up, just make sure your pot as a couple inches of extra room until it calms down.  The baking soda will help neutralize the acids from the canned tomatoes and you wont taste it at all.  
Remove the bay leaf from the soup and puree.  I use my food processor, but you can also transfer the soup to a blender to blend it until smooth, or if you chopped your onions and garlic finely enough and used tomato puree you can omit this step for a soup that isn’t as smooth.  
Once blended place back into the pot, stir in the honey and fresh basil and check for seasonings, adding salt as needed.  
I did a quick drizzle around the pot after reheating it and it came out just great!  

Remember that when you are using dried herbs: measure them out, I use the same amount as fresh and crush them before putting them in.  This activates the oils that were stored during the drying process and makes them more flavorful and fragrant.  Yes they are not as full flavored as the fresh but they do in a pinch.  

Add a grilled cheese on wheat bread and you have a meal fit for a hubby ... and the wife.  This is definitely going into the approved recipe folder.  Remember to taste your food throughout the process.  Some people will like more pepper some might want more garlic some might want to put something else like crushed red pepper in it but no matter what you decide to add or change the best ingredient to any recipe is you .... Enjoy!!!!!

Wednesday, March 6, 2013

Cheesy Bacon Ranch Chicken ... That's what's for lunch!

There's no getting around it .... I was bewildered on what to make for lunch and hubby was definitely no help!  Tons of stuff in the freezer but when asked "What would you like to have?" His reply "what do you feel like making?" ... Grrr! :0)

So I went looking after threatening that he would be eating cereal for lunch.  I'm not sure where I like searching better ... Google or Pinterest!  Found a recipe for Teriyaki chicken that I would LOVE to try but that's not what I wanted.  The problem was, I didn't know what I wanted.  I always have that problem.  Things SOUND good but it's not really what I want AND then there's the I'm not really hungry so how to I figure out what to make.  Cereal is sounding better and better. LOL!

So back to searching after grumbling to hubby that I can't figure anything out and I don't want the traditional baked or broiled chicken.  Then I remember:  HEY I have some scratch made ranch dressing in there, what can I make with that?  Hubby does love his ranch.  So I found a wonderful recipe from Table for 7 (http://www.ourtableforseven.com/2013/02/cheesy-ranch-chicken.html) that I kind of followed and tweaked.  Of course using my ranch made from scratch made the chicken flippin awesome!


What is better than that?!  I think that was the perfect meal, well for that day.  Hubby was helping fix the parents snow blower so he was TOTALLY surprised.  It's not hard to make at all and I always have some of the Ranch dressing, whether in powder form or wet form handy.  
For the recipe for ranch dressing that I use you can visit Self-Reliance by Jame (http://selfreliancebyjamie.blogspot.com/2011/08/tis-seasonings.html).  I usually only make 1/2 the amount of dressing unless we are going to use it as for my dressing as I cut the mayo 50/50 with plain yogurt.

For the chicken, I just used a brush and brushed the chicken with the dressing.  Sprinkled on some cooked bacon topped with cheese and cooked at 350 on a cookie sheet covered with foil for 20 - 25 minutes.  I remove the foil and pop on the broiler for a few minutes.  I make sure chicken is cooked to about 155 before broiling and then check to make sure it's done at 165.  Chicken is one food you definitely want to make sure that you cook well.  Add some garlic butter mini penne pasta and a few peas and YUM!  I appreciate when something comes together well.  Oh ... Breakfast this past Sunday was awesome!  It's been a while since we had chorizo and eggs. Hubby added some red peppers and onions to the meat and kicked the flavor up a little.  See he's learning.  This up coming weekend is the older brother's birthday, so that means cake time!  I will surprise you with what it will be later BUT keep a look out because it's one I haven't seen made like this before so I'm hoping everyone likes it because where my ideas come from is anybody's guess.  In the mean time, remember that the best ingredient to any recipe is you .... ENJOY!!!!!

Saturday, March 2, 2013

Chocolate Chai Cupcake for a Change

Well another year gone .... It's so weird, when it comes to birthdays everyone is SO sure what kind of cake they want.  Heck my older brother has already requested his, of course his birthday IS next week.  But ME?  I can NEVER decide.  I like it to be something different, something I have not had before.  I guess it's a good thing to always strive to try something new.   Of course I think that whenever I cook or bake something it's always something new because I just can't leave a recipe alone.  This one is no different.  I ALREADY know what I want to try different the next time.  It's good AND bad but never the same.  I shared some of these with the rest of my family, well those that were home (Sorry Brian, Christin, and Tam!)  And they enjoyed them!  However, I find that Pinterest is becoming a fun get away for me.  I am enjoying finding new things to try, whether they be food, DIY projects, medicinal remedies, etc.  So I found something and Oops it's a bad link but that's OK because it's NOT exactly what I'm looking for.  So I poke around some more, and make my own recipe.... well sort of.  I decided on a Chocolate Chai Cupcake with a Vanilla Caramel Buttercream frosting.  I took a generic recipe for a frosting and made it my own.  Then someone posted to take your favorite box cake recipe .... WHAT?  This woman does her best to NEVER use a boxed cake mix unless I truly CANNOT help it.  So I took my favorite from scratch chocolate cake recipe and added chai spice, also made from scratch, and VIOLA!  

Chocolate Chai Cupcake with Vanilla Caramel Frosting
It's really easy to make, but that's if you have some of it pre-made.  Since I've used my chai spice mix before, all I had to do was pull out my air tight container with Chai Spice in it.  
There are many recipes for it but I like this one, it seems JUST right.
2 teaspoons each Ground Cinnamon, Ground Cardamom, and Ground Cloves.
1 teaspoon each of Ground Ginger and Ground White pepper.  Whisk together and store in air tight container.
I recently made some caramel sauce for a friend and had some left over.  Used the recipe from http://wearemorethanjustsweets.blogspot.com/2012/07/its-rich-but-its-now-favorite.html Salted Caramel Sauce.

For the cupcakes:
1 1/2 Cups All Purpose Flour
2/3 Cup Cocoa Powder (I used 1/3 dark cocoa and 1/2 milk chocolate as I like a darker richer chocolate flavor)
1 Teaspoon Baking Soda
1/2 Teaspoon Salt, I only use Kosher
2 Teaspoons Chai Spice Blend (You can add more to your taste but I wouldn't add more than 3 total as you don't want to over power the chocolate flavor.)
1 1/2 Cups Sugar (I use a mix for the richer flavor and to add a little smokiness, so for this recipe I did 3/4 Cup Dark Brown Sugar and 3/4 Cup White Sugar)
1/2 Cup (1 Stick) Unsalted Butter, Softened
2 Large Eggs, Room temperature
1 Teaspoon Vanilla
1 Cup Milk
(Makes 18 cupcakes)

Preheat oven to 350, line cupcake tin with paper liners and set aside.
Sift flour, cocoa, baking soda, salt, and chai spice blend in a medium bowl and set aside.
Beat sugar, butter, eggs, and vanilla in a large bowl.
Add Milk and dry ingredients, alternating dry and wet ending in dry.  Do not over mix or you will have a tough cake.
Fill each one 1/2 to 2/3 full, and bade for 18 - 20 minutes or until a toothpick inserted in center comes out clean.
Let set 10 minutes and remove from tin to continue to cool completely.

For the frosting ... Really simple:
1/2 Cup Unsalted Butter, Softened
2 Cups Powdered Sugar, Sifted
2 Teaspoons Vanilla 
1 Tablespoon Caramel Sauce (You can use Hersey's if you don't want to make it from scratch :0))
1 Tablespoon Milk

Cream butter.
Beat in 1 cup sifted powdered sugar.
Add Vanilla and Caramel Sauce.
Add 1 cup sifted powdered sugar.
Add milk, beat on high.  Store in fridge if not ready to frost cupcakes BUT you will need to bring frosting to room temperature for ease of frosting.  
If frosting is not right texture you can add more (up to 1 more cup) of shifted powdered sugar of if too think 1 more tablespoon milk.

Frost those cupcakes and eat or serve... but do share them.  They are so worth it!  I guess it's always good to look around because you find something new to enjoy.  I am definitely looking forward to breakfast tomorrow.  It's Sunday morning and with hubby working some extra hours and trying to get back into the swing of things since the holidays we have not had a regular Sunday breakfast schedule.  But this Sunday is hubby's famous chorizo and eggs.  And even he's getting in the swing of changing it up. ;0)  I am looking forward to this ... then dinner at the family home and dinner is a surprise as I told Mom to make whatever she wanted.  LOL  So no matter what plans you have take a look around and trying something different because with all those recipes out there and all your imagination you can change something up and making it your own because remember,.... the best ingredient is you!  Enjoy!!!!!